.png "Menu")

Full tutorial to the origami dimentional layout

Hello everyone!
It's Yukie from Japan. My turn today to update Studio Forty's offiial blog!!
Are you ready for a tutorial?u
I am doing full tuto for a very unique 12x12 layout.

These are the paper you will need. All from Frosty Season collection.
I am using one white cardstock, too.
White card stock,
2 12x12 papers of your choice
3 6x6 papers of your choice ( You can also use 12x12 paper if you want)

Let's start with 6inch papers. please cut them in 0.75x2.25inches.
Which is, about 2cmx5.5cm.

Fold top and bottom like the picture. Make sure they are all in the same direction.

6pieces in a unit. I need to ask you to make...36 of these little pieces to make a snow flake.
Yeah. 36. 12 from each 6x6 paper. It sounds many, but not so, you can fold them while watching 30 mins news on TV.

OK, You have done all 36 of them? Thank you !
so just grab any paper, doesn't have to be white but maybe white card stock is the best. and cut them in 2 inches (5cm) wide, and mark it 2inches (5cm) zigzag and make 6 of the following diamond shaped pieces.


you will need 6 of the small folded pieces for one white diamond shaped piece.

Let's make a marking line on the center. Pen?Pencil? doesn't matter.

Glue the little folded piece in the very center.

Second piece.

6 pieces in the right position!


All 36 pieces in the right positions!!

Yes, you are ready to transform into the snow flake?

Let's see if it fits on the back ground. I just roughly placed.
Yay, It looks ok!

The back ground papers:
Brown paper:12x12 (30.5x30.5cm)
Blue paper :11.25x11.25 (28.5x28.5cm)
White card stock;10.75x10.75 (27.3x27.3cm)


If you are comfortable using sewing machine, pls sew the out line of the blue paper. And Distress the edges. Roughly, makes great effect, too.


Stamp the snow flakes randomly,
then drip the blue grayish color.


Distress on the edges again

Sew the white card stock.
If you don't have an easy access to the sewing machine, that's fine. You just glue them and if you like, you can pen stitch it, or just draw straight line with gray color pencil, or very thin black pen.
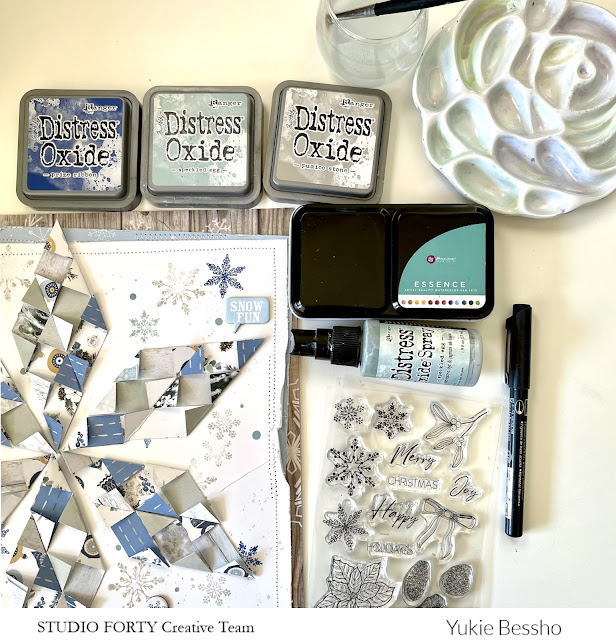
So these are the things I used for coloring.
( You see a little blue chip board there, which I removed later :))

Let's place the snow flake back.
Should check the shape of it on the paper, and glue them carefully.

Cut out the ornaments from the journaling card.
hang them from the snow flake.


Make flags and place sticker for the title.

If you find your photo is not very stick able, because the folded snow flakes are too fluffy, cut out some chip board stickers unused areas and make a pop up. so that your photo will stay very well.


So, congrats! You have goaled it!
If you want to add more chipboard stickers, go ahead.
They will make your lo nicer and cuter as always!
Can you see the small chip board stickers I have placed?
Nice to have little circles on my lo as I love circles!

The origami snow flake looks quite good!

Very unique too!!
Thank you for reading till the end.
I hope you can easily make one by this tuto.
Frosty Season collection →Click here
Bye for now!
Yukie

Origami background is popular among with Japanese crafters.
Heart shape and star shape are the all time favorites.
This one I have shared with you today,
my friend Miyuki Kawakami has given me the tips.
Thank you Miyuki for your acceptance of sharing!


.png)


This is incredible!!
OdpowiedzUsuń