Quick Summer cards | Dhaarani Mathivaanan

Hello Lovelies,

Good morning! Dhaara here with another quick greeting card I have created using the Essentials 2 Summer Collection. Summer collections have a beautiful color palate of journal cards and pattern patterns. Using this with minimal add-ons we are going to create a simple vacation documenting greeting cards.


Color palettes of the summer collection are very subtle and suit well for documenting our summer vacation memories. Through this greeting card, you can record your special summer memory and present it to your favorite people.

Greeting card measurements: 10.5cm *21.5cm(W*H) and started with adding the checked pattern sheet.


To add layers to the cover of the greeting card started with a few beautiful add-ons like Journal cards, enamel dots, stickers, and also transparent stickers


The faux stamp is just wow that added more beauty to the card. 


How can a vacation with no coffee?? The summer collection's ephemera has perfect wordings for our all-summer moods.

Do grab the summer collection and document your summer vacation memories❤️

-Dhaara

0 komentarze:

Zostaw komentarz, będzie nam miło.

Card Flowers - Jess Fernandes

 
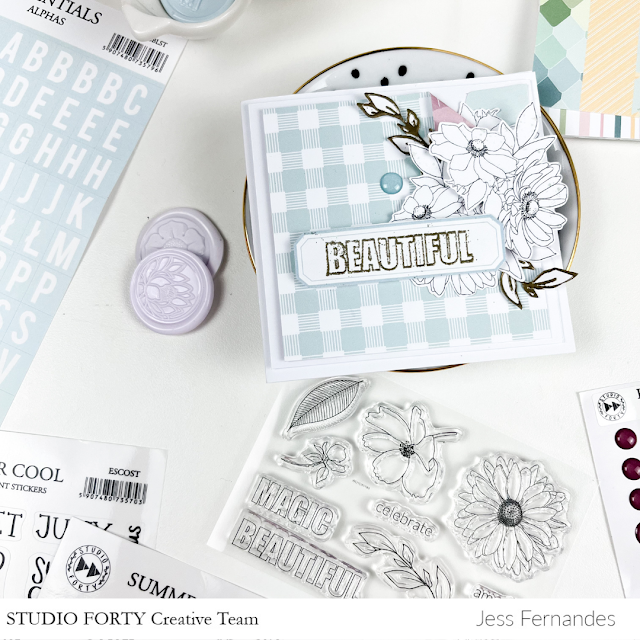
Hello, another blog post and today I bring you this beautiful card with foil details using the stamp from the collection!


The stamp offers various creative possibilities as you can use it on different surfaces and details.


The collection "Essentials - Summer - New Collection" brings a clean and delicate color palette to work with. This card was made using a white base and papers from the collection. The stamp detail in the title was done with foil, and the flower branches as well. 

My card measures 9.5 cm x 9 cm. It has a white base with foam tape and a checkered collection base with foam tape, adding depth to the card and creating beautiful layered effects.


Where the flowers are, I folded the paper to create a door-like effect, showcasing the flowers popping out. I also created layers of flowers to accommodate the tab with the word "beautiful."


Resulting in a super beautiful and delicate card. I hope you all liked it. I love being here, creating for you! Sending you lots of love, and until next time, happy crafting!


0 komentarze:

Zostaw komentarz, będzie nam miło.

Albania - a dream entry in TN | Magda Łuczak Art


Witajcie wakacje!
Wreszcie nadszedł ten cudowny czas relaksu, odpoczynku i realizacji marzeń. Nie wszystkie z nich dadzą się spełnić, ale... warto mieć marzenia! 
Ja od niedawna marzę o wyjeździe do Albanii. Wszystko to za sprawą pewnej Edyty z Instagrama. Jej rodzinna podróż kamperem tak mnie zauroczyła, że to państwo stało się dla mnie miejscem wartym zobaczenia. I o tym właśnie jest mój wpis do Art Notebooka (moja wersja Notesu Podróżnika).


Tym razem mój wpis zaczęłam od... poproszenia Edyty o możliwość wykorzystania przeze mnie jej pięknych zdjęć. A potem z czystą przyjemnością zabrałam się za przelewanie mojego marzenia na strony notatnika.


Napis ALBANIA powstał z dwóch kolorów naklejek alfabetu. Żeby literki były sztywniejsze, podkleiłam je grubszym papierem. Dzięki temu mogłam dodać im nieco przestrzenności, bo łatwo dały się podnieść na kosteczkach 3d.


Napisy po angielsku pochodzą z zestawów stempli Super Cool i Yummy Day. One również pod spodem mają kosteczki dystansowe (bo uwielbiam!).


Strona ze zdjęciem miała być idealna, więc trochę czasu zabrało mi przekładanie elementów i dopasowanie ich do mojej wizji perfekcyjnego wpisu. 


Bardzo lubię te doodlane ramki z bloczka z kartami do journalingu, więc i tu nie mogło ich zabraknąć! Ja uwielbiam tworzyć die-cutsy, również te z użyciem stempli. Tu widzicie listki (Oh flowers, znaczniki lokalizacji i przycisk szybkiego przewijania do przodu (Wakacje) - powielony cztery razy stał się małym borderem.


Koniecznie chciałam w tym wpisie użyć jakiś napis o marzeniach i udało się! W zestawie polskich naklejek Dzień za dniem znalazłam napis Spełniaj marzenia


Sama jestem ciekawa, czy kiedyś uda mi się spełnić to marzenie o Albanii... A nawet jeśli nie, to będę już zawsze pamiętała, że chciałam tam pojechać.

Ciekawa jestem Waszych wakacyjnych wpisów do TN. Jak widzicie, nie muszą być inspirowane wspomnieniami, mogą być po prostu tym, o czym marzycie.

Odpoczywajcie dobrze! I zbierajcie wspomnienia!
Uściski!


W sklepie czeka na Was mój stały rabat 10% na hasło MAGDAART10

0 komentarze:

Zostaw komentarz, będzie nam miło.

Summer Treat Bags/Nicole Martel

Hello, friends! I'm sharing a few summer treat bags I created using the Essential Summer papers, stickers, and stamps! They were super fun to make and I'm going to share with you how they came together. 

To begin, I used my Sizzix and metal bag die to cut out the pieces.

I used a bone folder to bend and flatten the ends. Next, I form the two pieces into box and used a strong adhesive tape to bond them together.

Super fun and perfect for adding gift cards or candy inside them for gifts!


I made a few more... 


Once I was finished putting the bags together, I made a few tags and stamped my images and colored them in using watercolor markers to add to the bags.


That cupcake stamp is super cute!!

What do you think? It's something different for me and I had fun making these little gems.


Thank you for visiting today. I hope you have a fantastic week!


0 komentarze:

Zostaw komentarz, będzie nam miło.

Summer LO| Piruletasdepapel

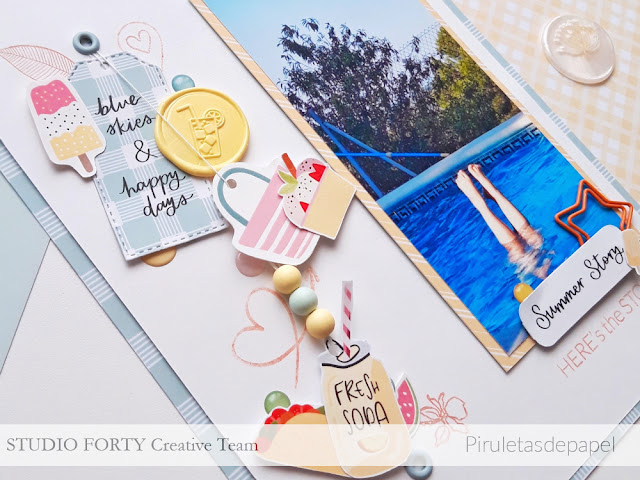
Hello friends! This is Nuria with a layout inspiration made with the new Essentials Summer collection! Summer is here and it can be terrific and terrible at the same time, don't you think? But a pool (any) always make days easier and showing your children how to do a handstand is the perfect excuse for playing in the water all day long... And that includes me! ;)


This time the LO is 6'*8' format. I used this beautiful squared blue patterned paper as a base. On top of it, a white cardstock where all elements are widespread. On the right hand of the white cardstock I placed the picture with a yellow stripped patterned paper underneath and two strips of paper as a decoration on top right of the pic.
On the left hand, I placed all embellishment elements in vertical wrapped with white thread. But let's see it in detail!


First of all, I stamped on the left of the white cardstock a leaf, a location symbol, a beautiful heart and a tiny flower. Then, I crop two holes, wrapped the white thread carefully and added the different elements. Finally, I embellished with eyelets.


This collection has a paterned paper with cards. I created a tag from one of the cards of the paper, trying to keep the phrase 'blue skies and happy days' centered in the tag. I added to the tag an ice cream  and a pastel yellow wax seal.  


I kept on decorating with a beach bag, an ice cream die cut, three coloured wooden balls, a refreshment and a taco die cuts, and a watermelon. Some enamel dots finalised the composition on the left.


Finally, at the bottom of the pic, I cut out a phrase 'Summer Story' and decorated with an ice cream and some dots. Below I stamped 'HERE's the STORY'.

And that's all for today! Hope you enjoyed today's post and don't forget to visit Studio Forty shop website, you will get 10% off with the code nuria10! 

Have a lovely weekend! 

Nuria


0 komentarze:

Zostaw komentarz, będzie nam miło.

Letni pop up box / Magda papierowy.cekin

Witajcie!
Dziś przygotowałam dla Was urodzinowy pop up box z najnowszej kolekcji ESSENTIALS Summer, która jest wprost idealna na letnie projekty. 


Bazę do Pop up boxu zrobiłam  z papieru scrapowego. Wykorzystałam arkusz w delikatna Żółtą kartkę


W kolekcji jest mnóstwo dodatków, które posłużyły mi do zrobienia najważniejszego elementu boxa, czyli wystrzałowego środka.


Die-cutsy wycięłam z Arkusza grafik do samodzielnego wycięcia oraz kilka zrobiłam sama za pomocą stempli. Użyłam zestawu Gratulacje oraz Super cool.


W pracy wykorzystałam oczywiście też naklejki, które przyklejam na papier scrapowy, a później wycinam. Bardzo przypadły mi do gustu naklejki Chillout, bo są bardzo kolorowe.


Z naklejek Alfabetu zrobiłam cyferki urodzinowe, które również podkleiłam na papier i później wycięłam. Wszystkie elementy zamocowałam na paskach ze sztywnej foli. 
 

Uwielbiam robić takie boxy! Są one bardzo efektowne i urocze. Idealne jako urodzinowa kartka. 


Mam nadzieję, że zainspiruje Was do tworzenia takich upominków.
Pozdrawiam, Magda

0 komentarze:

Zostaw komentarz, będzie nam miło.