Autumn mini-album in a box (with video) | Thai N.

Hello crafty friends,

This is Thai and I'm back with a new project using the beautiful 
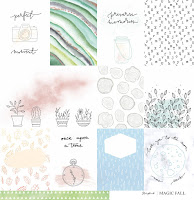
MAGIC FALL collection: a mini-album in box!


The papers from the collection are so gorgeous
 that I had to collect them all and mix them up in one single project. 
First, I decided to create a box to protect my mini-album. 
A box that looks like a closed book would be great, don't you think so?
I have recorded a video tutorial on how to create this mini-album + the box and it's right here:


I had da lot of fun decorating the inside pages as there are so many awesome embellishments
in this collection: transparent stickers, washi stickers, chipboards, etc. 


One of the 30x30 papers is made of cards to cut out and I love to use them 
to decorate a page in my mini-album, fast and easy.


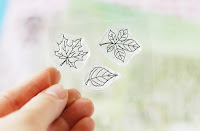
The chipboards are great as they can be used as they are or colored with some ink. 
This is what I did with this leaf, I used some Distress ink to make it pink!


This page is my favorite: I created a cute shaker using a circle die and a piece of vellum.
I've added big chunks of glitter inside to make it pop.

I also like to have folded pages like this one, it allows me to have 3 related pictures sitting together.


Wish you lots of inspiration and a wonderful crafty day!


0 komentarze:

Zostaw komentarz, będzie nam miło.

Notebook-edition in the mix⎪Heidi Ma

My blogpost from 28.9. (click here) showed you, how to fill a page of a Traveler’s Notebook with one sheet of patterned paper. Now there’s one step further: Let’s mix the papers!


And here’s the making of:

For the first one I mixed the papers in squares...


I always leave a little bit of white space on top of the page. That’s just my style, but of course you can mix the papers to fill the whole page.


The little chipboard connects the two patterned papers.


For the second I mixed the papers in triangles...


The right side is made with almost one set of stamps, stamped crisscross all over the page. 


 (Love this funny, magic photo. It seems she’s shouting: „Beam me up, Scotty!“... ;-)


For the third page I used squares AND triangles - not as a background but for a layering under the photo. 


(Tipp: If you like to, you can put some snippets aside if you cut out the pieces which are covert by the photo...)


 The products I used (You can click on the words to find them in the shop):

First page (squares):

MAGIC FALL -Notebook edition

Chipboards Summer travelove - around the world

Chipbords Magic Fall - Good night 

Chipboards Magic Fall- Ferns

Fairytales- transparent stickers

Second page (triangles):

MAGIC FALL -Notebook edition

Carpe Diem- transparent stickers

Magic - stamp set #78

Fairytales - stamp set #76 (→ the little star!)

Magic Fall - paper strips - sticker set


Third page (squares and triangles):

MAGIC FALL -Notebook edition

Magic World - sticker set

Magic Fall- transparent stickers

Carpe Diem- transparent stickers


0 komentarze:

Zostaw komentarz, będzie nam miło.

Love You | Stephanie B.

Hey Guys,

today i have a new Layout for you - and a matching card.
Both are showing you, that patterned paper isn't only good for backgrounds...

You can also use it for selfmade embellishments.


For this i cut out a lot of feathers and brought them in three lines.
Just fixing them with my sewing machine.... a few stamps and stickers...nothing more is needed.

This are my materials:
papier MAGIC FALL -Apples / Dreams
papier MAGIC FALL - The fantasy / So excited
paper MAGIC FALL - sweather weather / magic forest
Carpe Diem- banner stickers
Magic - stamp set # 78


And in the same way i made this greeting card:

Materials:
papier MAGIC FALL -Apples / Dreams
papier MAGIC FALL - The fantasy / So excited
Summer travelove - loved inscriptions


Hope you enjoyed it
xoxo Stephanie

0 komentarze:

Zostaw komentarz, będzie nam miło.

Autumn mood and magic card

08:36 , , 0 Comments


Hello! And today with you Irina. My new projects are a layout and a card.
This
layout is dedicated to my eldest son Michael. At the beginning of  the autumn we often walked and collected the most interesting things in his small bucket: cones, acorns, leaves! I made my layout about it.


First of all, I chose the need materials from the Magic Fall collection. Then I wrote a title Autumn mood with a brush. I scanned it and processed it on the computer. I cut it out of a thick cardstock on a plotter. I painted it in green.


Also I used a beautiful chipboard Mushroom. I painted it in a green. Stamps one of my favorite materials! I add it to every works. Stamps "Magic" is my love!


Added small accents with transparent stickers.


And my layout is ready! Here is the Autumn mood!


My second project is a magic card! Its character is stamps from the set "Fairytales"


So! In this card I decided to use an interesting technique - the resist - effect.I made a print by white ink and used two stamps with the image of amazing mushrooms!


From above I applied a turquoise watercolor  and used the ombre effect here. The inscription for this card is a stamp and chipboard. I combined them and made my own inscription. I painted the chipboard with a black permanent marker.


At the end I added artificial moss and a bit of splashing with white paint and turquoise watercolor.


The magic card is ready and my son is already waiting for it. He really likes these unusual mushrooms!


Enjoy your creativity with Studio Forty!


I used it:

0 komentarze:

Zostaw komentarz, będzie nam miło.

Cozy time | Asia N.

Witajcie!
Pogoda za oknem zdecydowanie pokazuje nam, że czas złotej i ciepłej jesieni już za nami.
Na szczęście ta jej zimna i ponura odsłona też ma swój urok. Nadszedł bowiem czas
ciepłych koców, rozgrzewających herbat i długich wieczorów.
It's cozy time!
W kolekcji Magic Fall znajdziecie arkusz pełen kubków, kubeczków i filiżanek
idealnie oddających ten jesienny czas.
Aby podkreślić tekturowe chipboardy umieściłam je w kole, do którego przykleiłam
wycięte dziurkaczem listki. Dla ciekawszego efektu - przeszyłam je na maszynie.
Nie bójcie się wykorzystywania wzorzystych papierów na obu
stronach notesu, jak widać - nie gryzą się. Ja dodatkowo
stworzyłam pasek, na którym odbiłam liście. Wzorów
jest więc sporo, a mimo wszystko nie jest to przytłaczające.
 Wykorzystałam tutaj duży arkusz Storybook, z którego wycięłam
elementy i skleiłam w całość - w taki jakby podtytuł.
Pozdrawiam!
Asia
Wykorzystałam:

https://www.shop.studioforty.pl/pl/p/papier-MAGIC-FALL-Live-forever-Storybook/707  https://www.shop.studioforty.pl/pl/p/Magic-stamp-set-78/710https://www.shop.studioforty.pl/pl/p/Fairytales-stamp-set-76/709
https://www.shop.studioforty.pl/pl/p/Magic-Fall-chipboard-sticker-set/720  https://www.shop.studioforty.pl/pl/p/Leaves-small-stamp-set-10/712https://www.shop.studioforty.pl/pl/p/MAGIC-FALL-Notebook-edition-zestaw-12-papierow-10x21-cm-/701

0 komentarze:

Zostaw komentarz, będzie nam miło.