Pokazywanie postów oznaczonych etykietą handmade. Pokaż wszystkie posty

Zig-Zag Goodie Box | Dhaarani Mathivaanan

box
 Hello Lovelies,
    Good morning! Dhaara here with an exciting project. Zig-Zag goodie box - sounds interesting right? Let's dive into it. 
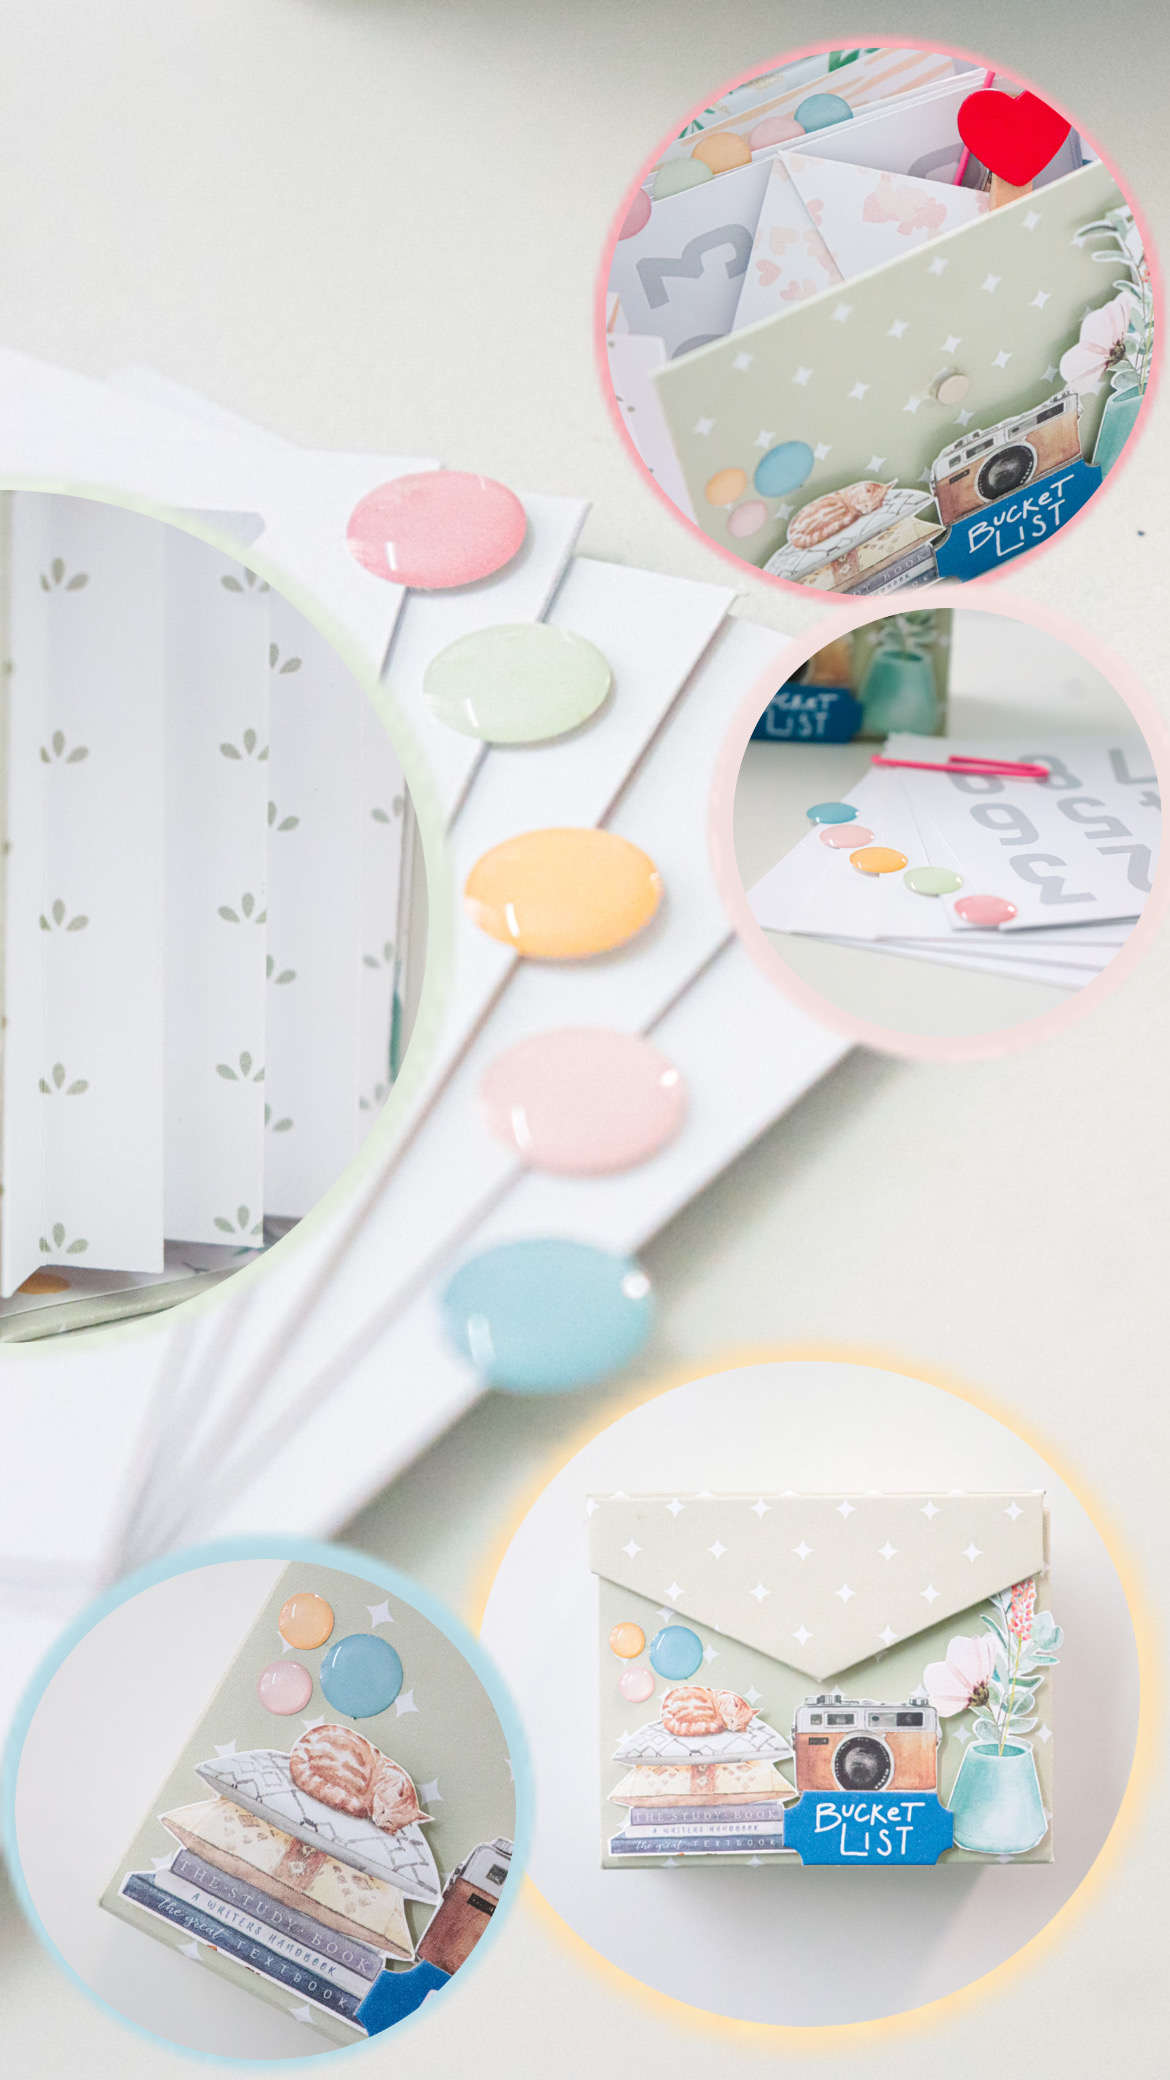
Let's go a little more colorful this time. Created this project using mix matching with the pattern papers and essentials collection journal card.


Starting with measuring the chipboard for the base and pattern paper for covering the same. Here goes the measurement as 7,5,7,5,3 * 9 (height*width) in m like below.


Let's now cover the chipboard with beautiful patterned paper on both sides.


Tada our base is now ready. Now we will focus on creating a zig-zag area surrounding the box sides.
Take a paper piece that measures 6.5cm*10cm(height*width)


At every cm score and fold front and back. Attach the zig-zag piece created to the base as shown above. 


Now let's add a few add-ons to the box to give it more beauty and texture. I love adding enamel dots a lot because even a simple project will be elevated to a different level with these beautiful enamel dots.


Now using essentials collection journal cards and envelop covers we will add a few items to keep inside the Zig-Zag goodie box.


Really love how the goodie box turned out. Give it a try, create a goodie box, and add beautiful add-ons inside the box☺️ Happy Crafting 🥰


Live Cozy, Mini Album with Cozy Time | Isa

album

 Hello everyone!! 

I hope everyone is doing great! It's Isa today on the blog and I want to show you a new mini album I created with the Cozy Time collection by Studio Forty. 

I cannot wait to work with the new collections and create things with it, but while I am working with Cozy Time! 


I have to confess that I truly love the packaging where I receive the new Studio Forty material, so this time I wanted to use one of the wonderful envelopes in which I always get my stickers. I have used a white envelope to make structure of the mini album and put the pages inside. I sewed some pages in the spine and also to the spine of the album. 


I have used the papers of the collection and some TN inserts for the pages of the mini album. I have made different sizes of the pages. 


In some pages I also added some tags and small envelopes to add extra elements. I decorated also with some elements I cut from the papers and stickers. 


And in the last page, as it is the envelope I used for the structure I added some PL cards of the Cozy Time collection.


I really enjoyed making this mini album, because I like this kind of crazy structures! I hope you liked it and I hope to have inspired you to create new things!! Take care of yourselves and see you soon!! Love,

Isa


Jest taki dzień... | Katarzyna Kowalicka

clear stamps
Cześć!

Jest taki dzień... jak dziś czyli Wigilia Świąt Bożego Narodzenia, w którym dzieje się magia :)
Ja często cofam się w czasie do czasów kiedy byłam dzieckiem, kiedy czekałam na tę pierwszą gwiazdkę, która oznaczała, że za chwilę usiądziemy razem do stołu. A dla dzieci to czas kiedy pojawiają się prezenty :) kiedy czekamy na Świętego Mikołaja z podekscytowaniem i obawą czy przyniesie nam wymarzony prezent!

Teraz kiedy jestem dorosła (choć wciąż wiele zostało mi z tamtego dziecka :)) to ja jestem tym Świętym Mikołajem, który obdarowuje najbliższych czerpiąc z tego wielką radość!

Dzisiaj chce Wam pokazać jak można zapakować prezenty, te drobniejsze gabarytami, jak karty podarunkowe czy pieniądze.


Odrobina papieru i odbitki stempli, pokolorowane kredkami akwarelowymi, świetnie nadają się na takie małe opakowania. I ile zabawy przy ich kolorowaniu :)


Wykorzystałam również paski z dużej kolekcji, a dokładniej nazwy na nich nadrukowane, które świetnie sprawdzają się w każdych pracach. Są na nich zwroty dopasowanie do kolekcji więc każdy pasuje i idealnie sprawdzi się zamiast naklejki czy odbitki. Polecam zachowywanie tych napisów :)


Tekturki również sprawdzają się nawet na tak małej powierzchni jak ta. Dodatkowo potuszowałam choinkę na zielono by jak najbardziej oddać charakter ;)


I mój trawerlers również powoli zapeÅ‚nia siÄ™ wpisami. Ten pierwszy to taka maÅ‚a tÄ™sknota za Å›niegiem, którego z każdym rokiem jest mniej a który uwielbiam! Wiem, że czÄ™sto narzekamy, że trzeba samochód odÅ›nieżyć, że mokro, Å›lisko ale ile w tym wszystkim fajnej zabawy w wojnÄ™ na Å›nieżki czy lepienie baÅ‚wana :) no i jazda na sankach! 


Dla mnie to najlepsza pora w roku, kiedy kawa z widokiem na ośnieżone szczyty smakuje jak nigdy...
Wtedy możemy zapomnieć o codzienności choć na chwilę.
Tę właśnie uwieczniła moje koleżanka Bea ale w pełni oddaje ona ciepło i tęsknotę za czasem i miejscem.
A do ozdobienia wyjątkowej chwili użyłam stempli i naklejki na transparentnym tle by nie zakłócić magii tego zdjęcia :)


Ten zimowy czas mimo, że bez śniegu kojarzy się nam z ciepłem, otuleniem kocem, grubym swetrem i ciepłymi skarpetami... i czujemy wtedy magię tej chwili.
Karta z kolekcji świetnie oddaje ten nastrój i dopełnieniem są tutaj stemple - niczego więcej nie potrzeba by zrobiło nam się cieplej na duszy :)


Korzystając z okazji wyjątkowości tego dnia chcę Wam życzyć samych radosnych chwil, uśmiechu, zdrowia bez którego ciężko w codziennych zmaganiach a także kilku chwil zadumy nad sobą, najbliższymi i chwilami, które trwają.

Wesołych Świąt!

Åšciskam!
Kaha


W swoich pracach wykorzystałam:


Beach Days TN | Vânia Fonseca

handmade
Hello Crafters, Vânia here! Who is ready to start documenting Summer days? Those days in the beach or even in the pool?

Today i´m sharing a fun idea to protect your notebook from the sand and water splatter, a Summer proof TN cover made with a PL  page protector. I´m also using the new Beautiful Life collection.


First you will need a PL page protector or some kind of plastic sleeve. I use one that i already have in my stash from the time i use that format to document my life.


 I trim the page protector using my notebook as a guide


And use the fuse tool to close some of the pockets, if you don´t have a fuse tool you can stitch those areas.


 Then i insert the eyelets so i can put the elastics and filed the pockets with some scraps. Simple, Right?


With the cover done I use acrylic paint to paint some charms and then add them to the elastic that keeps everthing closed.


To document on the go it´s always good ideia to have a pocket where we can store some scraps, project life cards or even some die-cuts. And that´s what i did here using one of the 12x12 sheets of paper.


I use some stamps and a cut file to decorate the front of my pocket.


On the inside you can see that i store some PL cards.


I usally leave the first page of my notebook with just time frame that i cover in that specific notebook, in this one that i will use to document the Suimmer season i only put the year and a little reminder.


 To decorate a little bit, i´m using images that a fussy cut from one of the 12x12 papers and some stamped ones.


For the first spread of this notebook, i decide to use a full page photo, the clear stickers are always perfect to use above photos where you have a large "clear" space as it happens in the sky area of this one.


Again on de right side of this spread i played with stamped images and fussy cut ones.


And that´s all for today, wish you all a wonderful week!

All the links to the products that i´m using are below.
Beautiful Life Collection
- Beautiful Life Notebook papers
- Journey Notebook
- Summer Vibes Stamp set
- Just Perfect Stamp set
- Noted Stamp set
- Let´s Go Stamp set
- Joyful Clear Stickers