clear stamp
Hey. Hey. Hello, everyone. I hope you're enjoying your summer and your vacation and that you're having a good time. Maybe you already have some nice pictures from your vacation? Or some trip? And would you like to try to print them and display them? Give them a frame and some cool summer stickers from the
Let's relax collection. Stick some magnetic tape on the back and stick the framed photos on your fridge or bulletin board. Or give framed photos as a gift. You'll see that the gifted grandparents or friends will be thrilled.
My frames are made in such a way that the photos in them can be changed. So they can be used next year with new holiday memories.
I used
these photoframe stamps for the frames. I made the stamp on patterned papers from the
TN set Let's relax. I used invisible ink and hot embossing with black embossing powder. The imprint is a bit embossed and makes a nice detail. It's not a perfect imprint everywhere, but I just love the dashed line.
I used black cardboard for the back of the frames and stuck foam double-sided tape in between. I left the top free so that the photo could be inserted into the frame.
The foam tape makes a 3D impression and the frame is beautifully sculptural and looks very nice.
I glued a piece of magnetic tape to the back so that the frames would stay on the fridge or bulletin board and could be moved.
How do you like it? I hope you'll try them too.
If you need to buy some material in the
S40 e-shop, don't forget to use the code Mirka10 and you'll get a discount on everything.
Have a great time.
clear stamps
Hi everyone!
Today a new layout from me about a wonderful afternoon in Tihany near the Balaton Lake in Hungary. I love this photo because it was taken by my nephew and because it reminds me about that happy afternoon.
On this layout I used one of my favourite paper the die-cut paper . I fussy cut the camera, the shells and all the other decorative elements and I glued on the white background paper using some 3D glue dots to highlight them,
But before all these I stamped on the background paper and I handstitched the stamped elements.
I know it is a little unusual this but I like to try out new things on my layouts.
With all these done I wrote the comment also using some stamps.
This wonderful collection you can easily buy in the Studio Forty store .With the code HAJNAL10 you have a 10% discount!
candle holders
Hello friends! How are you? A new term with Studio Forty begins and a new collection arrived: '
Vintage Glow'! I am super excited! YAY! :P
Vintage Glow is a romantic and very elegant collection, with powder pink, gold, blue, and green colors blended with black and white. It's Nuria here today, wanna see what's coming up?
Fall decorations are the projects I am going to show you today. I made two different
candle holders and a
garland. Let's start!
I love to use folding techniques to get tridimensional objects. Volume gives us a lot of opportunities to experiment with. My first candle holder has a diábolo shape with many folds.
I used the
Pink paterned paper to make the candle holder. On top of the upper cone is where the candle holds. The lower cone is the base of the candle holder. I subtle decorated the candle with dried lavanda and white flowers, a string and a
wax seal and
an enamel dot.
This tridimensional object made with paper has many purpouses, not only a candle holder: you can use it as a tray with some treats on the top, for example.
The next project is a pack of two candle holders. In this case I fold in a V shape the
Flowers patterned paper to get the shell shaped.
Let's finalise with the garland: It is a tiny and sweet garland made from leaves and
die cuts from the
collection. Have you seen that
key? What about that beautiful
vintage clock? Love that tiny
hearts!
One final picture...
That's all for today! Hope you enjoyed today's post and don't forget to visit Studio Forty shop website, you will get 10% off with the code nuria10!
Thanks for stopping by and have a lovely week!
Nuria
12x12 scrapbook layout
Hello everyone! The summer vacations have begun for me and before I go on vacation I have a layout inspiration for you! I combined the wonderful SUMMER ESSENTIAL 2023 collection with Bits & Pieces from other collections. Do you recognize them right away? Let's get started!
I find the combination of photo and photo journaling cards totally interesting! In addition, a few Frames, Stickers, Chipboards and Enamels Dots make a fabulous memory!
This funny photo of my son with his friends is a wonderful memory. I completed the layout with a matching quote.
Here you can see how I arranged the frames. Of course, no Dots 3D Sticker may be missing! I used matching colors from the collections
Summer Essentials 2023 and
Lazy Days.
I hope I can inspire you and wish you a fantastic creative time!
Thanks for stopping by!
Kerstin xx
die cuts
The mini album is very small. It is 4,5*4,5cm (1,7'*1,7') and has an accordion structure, each page is separated with a 1 cm spine size. I decorated each spine with the corresponding
patterned paper. The closing is made with an orange thread bow. The lenght of one of the sides of the thread is double as it has to contain the back of the mini album.
That's all for today! Hope you enjoyed today's post and don't forget to visit
Studio Forty shop website, you will get 10% off with the
code nuria10!
Have a lovely week!
Nuria
cards
Hello friends! This is Nuria with a
layout inspiration made with the new
Essentials Summer collection! Summer is here and it can be terrific and terrible at the same time, don't you think? But a pool (any) always make days easier and showing your children how to do a handstand is the perfect excuse for playing in the water all day long... And that includes me! ;)
This time the LO is 6'*8' format. I used this beautiful
squared blue patterned paper as a base. On top of it, a white cardstock where all elements are widespread. On the right hand of the white cardstock I placed the picture with a
yellow stripped patterned paper underneath and two strips of
paper as a decoration on top right of the pic.
On the left hand, I placed all embellishment elements in vertical wrapped with white thread. But let's see it in detail!
First of all, I
stamped on the left of the white cardstock a
leaf, a
location symbol, a
beautiful heart and a
tiny flower. Then, I crop two holes, wrapped the white thread carefully and added the different elements. Finally, I embellished with eyelets.
And that's all for today! Hope you enjoyed today's post and don't forget to visit Studio Forty shop website, you will get 10% off with the code nuria10!
Have a lovely weekend!
Nuria
cardmaking
Witajcie Kochani!
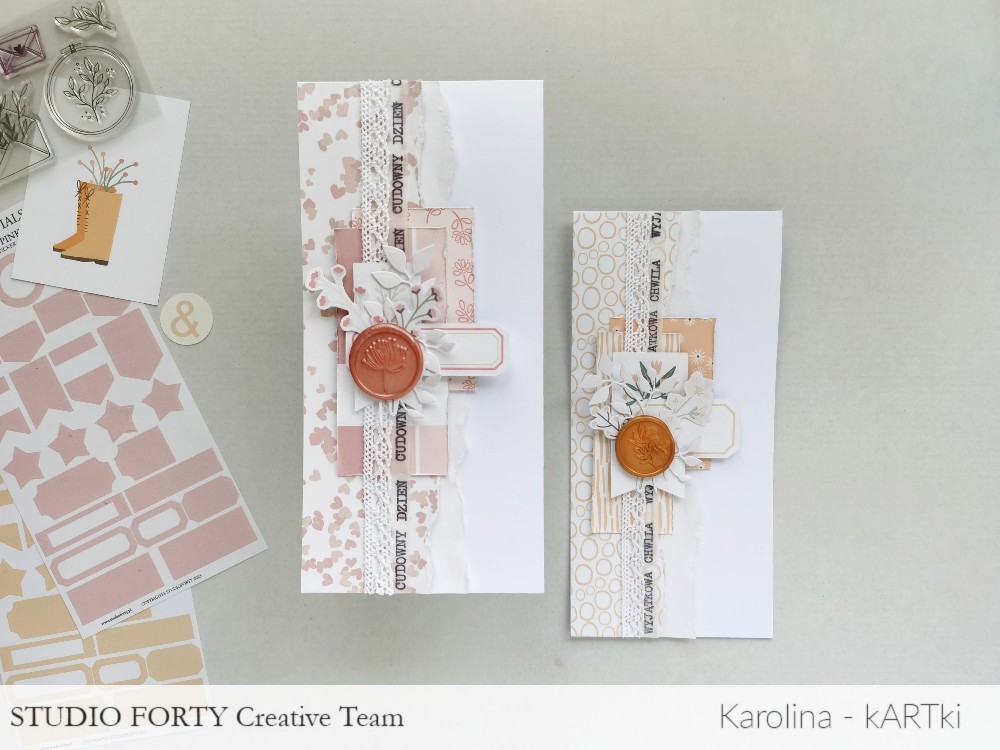
Dziś moją inspiracją są dwie warstwowe kartki w formacie DL, utrzymane w jasnej kolorystyce z przepięknymi pieczęciami z kolekcji ESSENTIALS, które są tutaj "wisienką na torcie".
Tworząc je miałam na myśli, że będą kartkami ślubnymi, ale właściwie można je potraktować dość uniwersalnie.
Zdecydowałam się na bazy DL, bo papiery z bloczka notebook edition właśnie do takich idealnie pasują. Wykorzystałam też moje skrawki pozostałe z innych projektów - kawałki kart journalingowych.
Dodałam koronkową wstążkę i paski białej kalki, na których nastemplowałam słowa z zestawu JEST WSPANIALE. Następnie papierowe elementy (banerki i etykiety), wykrojnikowa gałązka oraz kolorowe, roślinne naklejki z zestawu FLOWERS, podklejone białym kartonem.
To już wszystko na dziś ode mnie. Pozdrawiam serdecznie!
Karolina.
.png "Menu")


.jpg)