Pokazywanie postów oznaczonych etykietą piruletasdepapel. Pokaż wszystkie posty

Bloom! | Piruletasdepapel

3d stickers
Hello! How are you? I'm up on the Studio 40 blog today with a TN pages spread! I'm using the fun and springish Spring Time stack of papers. Let's get started!


More hours of daylight, beautiful colors and heady aromas... It's time of the bloom! The TN paper with different pots of blossoming seeds is perfect for documenting this memory. I choose the pink floral TN paper as background, leaving a white margin on the perimeter when gluing it on the TN. 


Then, emboss a white cardstock and wrap it with some pink thread. Cut some pots (from the TN paper) in a circular shape and glue it on the thread. Add some enamels and the photo, you can choose a circular shape as in my version, but it can be a tag, a star, or any other metal die shape you have. The notepad die cut I chose has some space to write the date on it. 


On the left page, make a central element with the dots couloured paper stickers: I like the degradated effect putting them in vertical. The circular shape ensures uniformity with the page on the right.


Below the three circles add some decoration. I have used a die cut and a 3D sticker to create a wooden pot with flowers. I finalise the decoration using the alpha sticker to write the word 'bloom!'.


And that's the final result! Hope you enjoyed today's post!

Don't forget to visit Studio Forty shop website, you will get 10% off with the code nuria10! 
Have a lovely week! 

Nuria


Little things | Piruletasdepapel

clear stamps

Hello everyone! How are you? This is my first post this new year and I would like to start 2024 focusing on little things, such as delicate embellishments. I love to create clusters of embellisments with different materials: I use stamps, stickers, wood charms, diecuts and enamels. Today I am going to focus on stamps and paper. It's Nuria here today sharing with you some delicate embellishments as add-ons on my pages! 


I create this two pages on a Vintage Glow Journey Notebook. I stamp on regular white cardstock some snowflakes and the word together and cut them out with scissors. Remember this two super tips before stamping: evenly apply ink to your stamp - not to put your stamp into your ink -. After inking, press the stamp onto your paper of choice and press down firmly. Do not rock the stamp back and forth as can cause uneven printing!


I make a circle and a strip with the beautiful Brrr patterned paper and sew the perimeter on white thread. These will be the bases for each page embellishment. I love stamping on regular paper, but I especially love stamping on special paper. Vellum paper is one of my favourites, I stamp the ponsetia on vellum paper three times.


If you stamp white on vellum you'll get a super elegant finish. Need some extra volume? Try adding white embossing powder to your projects - you'll love it!😍 Can you see the shimmery effect? Embossing ink is perfect for heat embossing because of its slow drying property, though you can use pigment ink as well.


Let's assemble the embellishment cluster and give the final touch with enamels and the first page is ready!


In the second page I want to keep continuity with the first one. So, I make a little cluster playing with layers and the strip of sewn patterned paper, two snowflakes and an enamel.


Finally I add a tag made of patterned paper on white cardstock. I decorate it with an acetate tag, on which I stamp "Happy Christmas" in white pigment ink. I will place the pics in the die-cut circles on this tag!


And that's all for now, friends! Hope you enjoyed this delicate post! 

Wish you a successful 2024! ✂️🎉

Thanks for stopping by and have a lovely week!
If you visit Studio Forty shop website, you will get 10% off with the code nuria10! ;)


Nuria


Christmas wreath | Piruletasdepapel

clear stamps

21st December is here! I've been rushing all month, friends and family are about to come and my home has no Christmas decorations yet!🫣 If this is your situation, keep reading, I have good news for you!😏 It's Nuria here today sharing with you a Christams wreath!


Making your own wreath is a fun and creative way to add a personal touch to your holiday decor. There are many places where you can hang a Christmas wreath to add a festive touch to your home: front door (classic choice), indoors (over a mantel, above a mirror), windows, a little corner... any spot is perfect for your Christmas wreath!🥰 


For the wreath skeleton use steel wire for DIY and a cake pan to help getting the round shape. After 3 or 4 turns, you go from a simple steel wire to a wreath. Use ribbon to hide slightly the wire. 


Use small, medium, and large ornaments in your wreath, alternating between sizes to create a varied look. Use a metal-die to cut 15 stars in different sizes and types of paper. Wildflower, winter city and pink are the patterned paper I use for the stars, but I also have cut some stars on vellum paper. Make foldings to some of the stars to get a 3D effect, even the little ones and on the vellum stars as well. Be careful no to tear the vellum paper while folding it. 


When you’re finished decorating your Christmas wreath with ornaments, the top of the wreath isn’t going to look pretty. To hide the top of the wreath use ribbons of different colours. Add special elements to your Christmas wreath to make it interesting: I make embellisments stamping on acetate!🤯 Look at the holly tree leaves, the snowflakes or the Happy Christmas star! Then, you can cut them with scissors or with a star shape metal-die!


And that's all for now, friends! Hope you enjoyed this post and thanks for stopping by! 

I wish you a Merry Christmas and Happy Holidays!🎄🎁✂️🎉

Remember that on Studio Forty website you get a 10% off with the code nuria10!


Advent Calendar mini-album | Piruletasdepapel

advent calendar
It's....TIME!!🎃 🧊🎄The season for traditions, family reunions, beautiful lights, tasty and delicious meals and the magic of Santa Claus has begun!🎊 Hello everyone! It's Nuria here today sharing an Advent Calendar mini-album! Let's get started!


This Advent Calendar mini album is actually made of 3 "one sheet mini albums" put together. It has 24 pages for each day in December until Christmas Eve. For the structure, make 3 eight page pocket mini albums. I use patterned papers from Nordica collection: arctic, wildflower and forest walk. The mini albums are 3x4 inches. 


I decorate the cover with journaling cards elements and chipboard stickers from the Together collection. Also, a beautiful white handmade crochet circle, a ball of wool stamp in pink and some enamels from Vintage Glow collection are part of the embellishment cluster.   


I love this structure for the Advent Calendar as it has a pocket for each day where you can slip a tag or a PL card. I decorate tags and pockets with journaling cards elements from Together and Vintage Glow collections. Write a fun Christmas activity on each tag or card, it will be covered by the pocket.


Punch holes in the side of each mini album where it will be bound, make sure the holes are in the same place, so they match up when layered together. I make some pockets more when attaching the mini albums together, instead of gluing the pages completely. 


The opening of the tag pockets is vertical and these are horizontal. I decorate with ribbons and slip PL cards from Vintage Glow and Together collections inside the horizontal pockets. Attach the rings to the holes to bind the minialbums. 


Vintage Glow patterened papers also make a good match with Nordica collection! The number 14, the chipboard stickers and the colour sticker are from Together collection. I love to mix collections and elements!


As each day arrives, pull out the tag for that day and do that activity. Have Christmas FUN! 


I wish you a very happy holidays and a very happy Christmas!🎊 


PS: Don't forget to visit Studio Forty shop website, you will get 10% off with the code nuria10! Thanks for stopping by and have a lovely week! 

Nuria


Fall memories | Piruletasdepapel

die cut elements
Hello everyone! How are you? I'm up on the Studio 40 blog today with a layout using Vintage Glow collection. It's time to grab blankets and warmer clothes! Autumn is finally here, I think it's my favourite season: the colours, the light and the weather are amazing! If you can go hiking in the mountains, then the weekend is perfect! Wanna see how I documented my fall memories? Let's start!


To make the layout stamp several times the big fluffy bubble stamp from the Vintage Glow collection. Stamp them in different fall colours. Then, when dry, stamp a floral element in a colour that match on top of the bubble stamp. I use the same colour for the floral elements in all the bubbles. Mind that I stamp them in a plain white cardstock, cut out the elements with scissors and glue them on a texturised white cardsotck. 


I choose a circle form when gluing the elements, the circle is opened on the top right. But possibilities are endless! What about trying a wave shape? When sticking them, I create some volume using foam tape. I position the picture in the inner circle, on the right-down. I cut the image in a round shape. 


I also used different types of stamps from the Abstract Set: to decorate the inner circle I used the little dots stamp and to decorate the outer circle I used the one with circles.   


Two metal die cuts in white and Pink patterned paper complete the decoration of the circle.


Finally, I tear the perimeter of the white cardstock a bit and break it slightly in two areas. I stick the layout on a Wood patterned paper and add a couple of decorative elements on top right: a bubble stamp with a floral die cut.


Who has a stamp, has a treasure ;) Don't you think? Final touch with enamel dots, a bouquet of flowers diecut, journaling and date on the back of the patterned paper and my fall memories are documented! ;)


Hope you enjoyed this post! Thanks for stopping by and have a lovely week!
If you visit Studio Forty shop website, you will get 10% off with the code nuria10! ;)


Nuria


Culinary travels | Piruletasdepapel

clear stamps
Hello everyone! How are you? I'm up on the Studio 40 blog today with two 'delicious' notebook pages, using Vintage Glow collection. When visiting a tourist destination, the itinerary will most likely include recommendations of Gastronomic Routes: a tour of emblematic and significant places for the local gastronomic culture, and recommendations of the most diverse dishes. I really like Gastronomic Routes. To me, gastronomy is so closely linked to the culture of a country that we should always document the favourite dishes of our tourist destinations in our albums, and I think that notebooks are perfect format for that! Let's see how I documented mine!


I recently visited València, the third-most populated city in Spain on the east coast of the Iberian Peninsula. Nowadays, the star dish in València's homes and one of the most outstanding dishes in Spanish gastronomy is paella. To document the dish I used a large picture, according to the notebook size, on one side. I cover the picture with a vellum page to soften colours and to decorate the page as well. I used very subtle decoration: a strip of 'Green' patterned paper, notebook size and a diecutted piece of white cardstock and a green enamel dot


I created a pocket when I stuck the photo, to add inside the pocket some interesting journaling about paella. Did you know that Valencian paella originated during the 15th and 16th centuries in the more rural areas of Valencia? This dish was born out of the peasants' need to prepare an easy meal with the ingredients they had at hand (rice, chicken, string beans, and others). Paellas were always cooked over a wood fire, especially orange tree wood. 


On the other page, I made a composition using clear stamps with words from 'bits of life set' and 'yummy day set'. Clear stamps give you so much freedom when composing pages! I decorated the page with a green banner, a bit of white thread under the banner and a green enamel dot. On the side, a strip of 'Green' patterned paper, notebook size and a diecutted piece of white cardstock to give some continuity to the page. 


The following pages showed a delicious and Valencian typical beverage: Orxata. It is made with sweetened tiger nuts and served ice-cold as a natural refreshment in the summer, often served with fartons (a delicate and spongy sweet pastry).


In the large picture you can see the orxata and some tigernuts in a basket. The pic is decorated with transparent stickers to give a romantic touch. 


On the other page I used  'Gold' patterned paper, notebook size as background. The central element is a PL card. I stamped the words 'Sweet', 'guilty pleasures' and 'bits of life' in black and stuck it as a pocket to add a tag. Two pink enamel dots finalises the decoration.


The tag is made using the dotted side of the PL cards (very useful, indeed) adding the journaling and decorations: a strip of patterned paper and a diecutted piece of white cardstock and a pink enamel dots at the bottom side and some tulle and thread at the upper side.


And that's all for now, friends! Hope you enjoyed this delicious post! ;) Thanks for stopping by and have a lovely week!

If you visit Studio Forty shop website, you will get 10% off with the code nuria10! ;)


Nuria


Autumn Cards | Piruletasdepapel

clear stamps
Hello everyone! How are you? It's Nuria here with new and fun inspiration! I want to show you three cards made with the romantic 'Vintage Glow' collection. To me, stamping backgrounds is one of the best ways to relax and disconnect. The background doesn't have to be perfect because it is the project overall result that counts. So, feel free to mix different colours and under different perspectives when stamping! The colour palette of Vintage Glow makes the task easier as they combine easily with many ink tones (beige, black, pink, green...even white or gold).


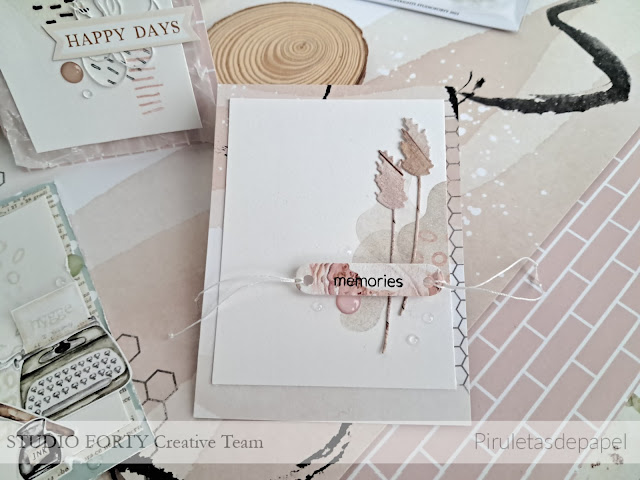
The cards are 7,5 x 10 cm, you can use them as a postal card or as a PL card. The three cards are made in layers. On top, they have white cardstock stamped and a sentiment, and a layer or two of patterned paper underneath. I used the stamps of the 'Vintage Glow' collection as background to make the cards. They are plenty of possibilities! But let's start with the first card: 


'Happy days' card: You may have already noticed that I love the 'Pink' patterned paper with pink bricks, so I used it as the base of the card. On top I added crumpled vellum paper. The white cardstock on top has a background made with the soft and fluffy bubble stamp in beige, combined with pink stripes stamp and black lines stamp. The sentiment is made with the happy days sticker. White thread, an enamel dot and some crystal dots made the decoration.    


I absolutely love this writting machine! Isn't it beautiful? If you look carefully, you will see the 'hygge' word (sentiment) stamped on the paper coming out from the writing machine. I chose the 'Blue' dotted patterned paper and, for the sake of consistency in the card, the patterned paper with words 'Book' as second layer underneath. Sometimes casuality knocks at your door, when I was composing the card with the diecuts (pen and ink pot), I realised that the black zigzag stamped as background was the perfect match for the pen. I complete the background with circular and lunar forms stamps in different tones of green ink. An enamel dot and some crystal dots finalise the decoration. 


The predominant colour of the third and last card is beige and it only has two layers. I chose the 'Abstract' patterned paper as the base, the 'Wood' patterned paper to diecut two herbal elements, and the 'Blush' patterned paper for the tag. The sentiment 'memories' was stamped in black. The background is stamped with the smaller soft and fluffy bubble stamp in beige and circles stamp in pink. Love this combination!


And that's all for now, friends! As you can see, patterned papers of Vintage Glow collection are super versatile, elegant and really easy to combine with each other. Hope you enjoyed today's post and seriously, you should not miss this collection!! 

If you visit Studio Forty shop website, you will get 10% off with the code nuria10! ;)

Thanks for stopping by and have a lovely week!


Nuria